Countertop slab yield: what's a good number?
Slab yield is the percentage of total slab area that ends up as usable countertop material after nesting, kerf, and edge waste are subtracted — and a good number for a mixed-unit multifamily job generally lands in the 75–85% range. StoneNest's own published demo job (Ridgeline Flats: 3 unit types, 108 units) nested to 81.6% yield across 132 slabs at a 0.133″ kerf — inside that range, on real piece geometry, not a rounded estimate.
How yield is calculated
Yield is simple to define and hard to hit consistently by hand:
The denominator is every slab the layout opened, including any slab that's only partially filled. The numerator is the actual footprint of every piece placed — islands, counters, splash strips — after kerf and edge offset are already accounted for. A layout that opens an extra slab for one stray piece takes a real yield hit, even if every other slab is packed tight.
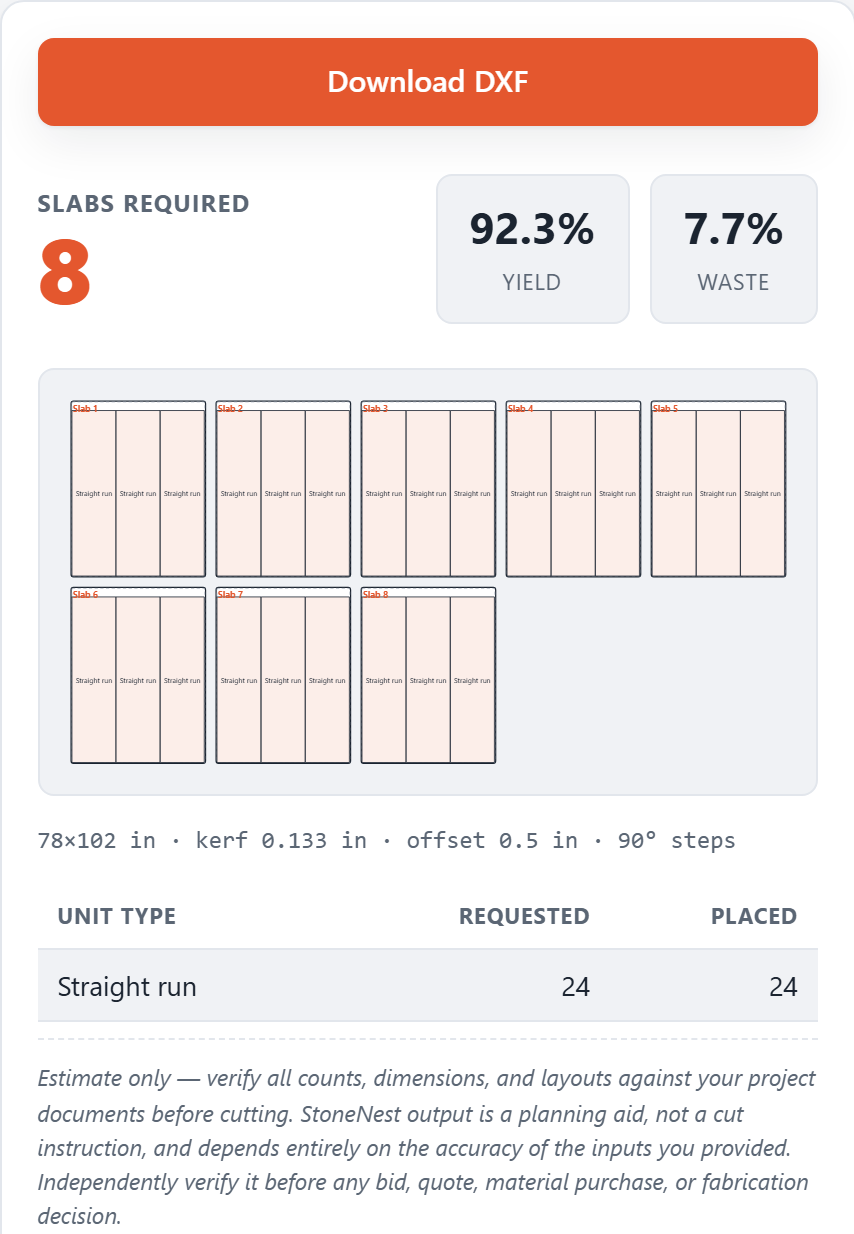
Yield percentage shown next to the nested layout on the Ridgeline Flats demo job: 81.6%.
What moves yield up or down
Piece mix
A mix of large islands and small splash strips packs less efficiently than uniform pieces of similar size, because odd leftover space is harder to fill.
Kerf and edge offset
A wider blade kerf or larger edge offset removes more usable material per cut. The 0.133″ default used on the Ridgeline Flats nest is a real shop saw setting, not a placeholder.
Rotation policy
Letting pieces rotate freely generally raises yield versus a fixed-vein-direction policy, at the cost of vein-match control on the finished piece.
Higher yield isn't automatically the right answer
A layout that force-fits a piece into a slab it barely fits on can post a slightly higher yield number while carrying real cutting risk — too little edge margin, a piece straddling a seam it shouldn't. When a piece doesn't cleanly fit, StoneNest opens a new slab rather than force-fitting it. That's a deliberate, documented trade-off: it can cost a percentage point or two of yield in exchange for a layout that clears the independent validator (0 overlaps, no off-slab placement) before it's allowed to export.
Want the slab count itself, not just the yield behind it? See how many slabs you need.
FAQ
What yield percentage is considered good?
For a mixed-unit multifamily job, 75-85% is a reasonable range. The Ridgeline Flats demo job (3 unit types, 108 units) landed at 81.6% yield across 132 slabs. Single-kitchen jobs with simple, uniform pieces can run higher; jobs with many irregular or oversized pieces will run lower.
Is a higher yield percentage always better?
Not if it comes from force-fitting a piece too close to a slab edge or a seam. StoneNest opens a new slab rather than force-fit a piece that doesn't cleanly nest, which is a deliberate trade-off between yield and a layout that passes validation before export.
Does yield include kerf and edge offset?
Yes. Yield is calculated after kerf and edge offset are already subtracted from each piece's footprint, so the percentage reflects what's actually usable, not the pieces' raw dimensions.
How do I see yield for my own job?
The free web estimator at /try/ shows yield percentage for up to 3 unit types (100 qty each) directly in your browser. The desktop app (7-day free trial) computes yield for full DXF-based jobs up to 18 unit types.
See what your own job nests to
Try the free web estimator with your own unit counts, or start the 7-day free trial for full DXF import, export, and the validator gate.